How to Make a Fairy Doll Cake
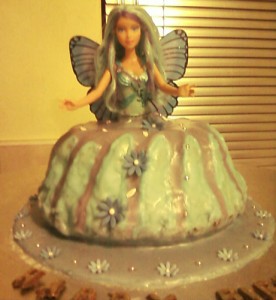
I made a fairy doll cake for a beautiful little girl who still believes in fairies (don’t we all?) It was her birthday and her dad begged me to make her a special cake at the last minute.
You can also make your own fairy doll cake (or princess doll cake, depending on the doll you buy) very quickly and easily. This is also a perfect centerpiece for a princess tea party.
You will need:
- A doll of your choice (Barbie
type)
- Bundt cake pan
- Edible sugar flowers, preferably in the colours of the doll’s original dress
- Edible silver balls
- Vanilla cake mix and required ingredients
- Round cake board
- 7 ounces (200g) powdered sugar (icing sugar)
- ¼ cup (60ml) water
- Liquid food colouring in the colour of the doll’s original dress, or mix to create the colours you need
- A few finger biscuits
How to Make Your Fairy Doll Cake:
- Prepare cake mix according to the directions on the packet.
- Pour batter into Bundt cake pan prepared with non-stick spray.
- Bake until done – a toothpick, skewer or thin-bladed knife will come out clean when inserted into the centre of the cake.
- Remove the cake from the oven and leave it to cool for ten minutes before turning it out onto a wire rack.
- Remove the doll’s skirt but keep the top on. Carefully remove the doll’s legs and tie its hair on top of its head so that it’s out of the way while you decorate the cake. Lift the arms above the head, too.
- Sift the powdered sugar into a mixing bowl, add the water and beat until smooth. Mixture should coat the back of a metal spoon when done.
- Set about 1/3 of the glace icing aside.
- Dip the finger biscuits in a little icing and fill the hole in the middle of cake with it. There should be a little cavity where the doll’s hips will fit snugly. Pour a little glace icing over this hole and secure the doll into it firmly, making sure there’s no room for movement.
- Tint 2/3 of the icing with the main colour of the doll’s dress. In my case, it was pale blue with lavender accents, so I coloured mine pale blue. Try to match the colour of the doll’s dress as closely as possible.
- Pour all of the icing over the top of the cake, ensuring that you cover the hips of the doll as well. Use a spatula to help you with the ridges of the cake.
- Allow icing to set.
- Add a few drops of food colouring to the other 1/3 of the glace icing in the secondary colour of the doll’s dress (in my case, lavender).
- Pour all around the doll’s waist, allowing the icing to drip where it may.
- Spread the extra icing that accumulates around the “dress” to form a circle.
- Decorate the fairy doll cake with edible sugar flowers before the icing sets and around the circle below the dress. You can alternate the flowers on the dress with petals broken off of a sugar flower. On the circle, alternate the flowers with edible silver balls.
- Untie the doll’s hair and arrange it the way it originally was. Move the arms down so they almost touch the cake.
Tips and Tricks
- It is imperative that the powdered sugar is sifted prior to adding water for the glace icing. Otherwise clumps will form and spoil the smooth effect you want to create.
- Add a little more powdered sugar to make the icing thicker, or add water drop by drop to make it thinner.
- If you are expecting a lot of people at the party and the Bundt cake will not be enough, use an extra cake mix and bake a plain cake (either round or square). Top with glace icing then firmly fix the Bundt cake on top before decorating the Bundt cake. This will create a platform or a stage for the fairy doll cake.
- Take the legs, doll accessories and the box that the original doll came in, with you. It will be a present for the birthday girl, along with the cake. After the cake is cut, carefully remove the doll and wash it under running water. Dry and then put the legs and the skirt back onto the doll.
- You can use a bell-shaped cake pan instead of a Bundt cake pan. For this, you can omit the finger biscuits and carve a hole at the top of the cake to fit the hips. However, the glace icing will cover the entire cake smoothly – you will then have to decorate with normal icing over the glace icing by piping lines and flowers, lace, etc. It’s therefore easier and faster to make the cake with a Bundt cake pan.
Conclusion
We arrived at the birthday girl’s party a little shaken but relieved that the cake had withstood the hard braking and hair-raising manoeuvres during the journey. Someone had decided that we weren’t there and suddenly switched into our lane without warning as we were about to drive past! We nearly collided with his car! The fairy doll cake had certainly been shaken up a bit.
When walking through the front door, we were greeted by mouths shaped into perfect O’s as the guests set their eyes on the cake, as well as gasps of delight and amazement. When the birthday girl arrived, her eyes lit up and a huge grin of wonder spread across her face. She threw her arms around me and hugged me tightly. Her reaction was enough to convince me that this fairy doll cake, along with the doll, was the perfect gift for her after all!
